About Mac OS X v10.6.3 Update
The 10.6.3 Update is recommended for all users running Mac OS X Snow Leopard and includes general operating system fixes that enhance the stability, compatibility, and security of your Mac, including fixes that:
1.improve the reliability and compatibility of QuickTime X
2.address compatibility issues with OpenGL-based applications
3.address an issue that causes background message colors to display incorrectly in Mail
4.resolve an issue that prevented files with the # or & characters in their names from opening in Rosetta applications
5.resolve an issue that prevented files from copying to Windows file servers
6.improve performance of Logic Pro 9 and Main Stage 2 when running in 64-bit mode
7.improve sleep and wake reliability when using Bonjour wake on demand
8.address a color issue in iMovie with HD content
9.improve printing reliability
10.resolve issues with recurring events in iCal when connected to an Exchange server
11.improve the reliability of 3rd party USB input devices
12.fix glowing, stuck, or dark pixels when viewing video from the iMac (Late 2009) built-in iSight camera
For detailed information on this update, please visit this website: http://support.apple.com/kb/HT4014.
For information on the security content of this update, please visit: http://support.apple.com/kb/HT1222
To Download Visit:
http://support.apple.com/downloads/DL1017/en_US/MacOSXUpdCombo10.6.3.dmg
Friday, April 9, 2010
How to remove an email account in Mail
1.Open Mail (click it on the Dock or open it from the Applications folder).
2.From the Mail menu, choose Preferences..., or press Command-, (the Command and comma keys).
3.Click the "Accounts" icon.
4.Select the account you wish to remove.
5.Click the "-" (minus) icon. You will be alerted that "The account's setup information, mailboxes, messages, notes, and to do's will be deleted permanently from your computer."
6.If you are sure you want to remove the account and email messages from your computer, click "Remove" to complete this process.
How Set Up Email Account in Apple Mail
Before you configure Mail
>Make sure you are connected to the Internet (test with a web browser, for example).
>Use Software Update to install the latest available updates.
Configuring Mail via "Automatically set up account"
1.Enter the settings on the right.
2.Click Create.
3.You should now be able to test your new account by sending an email to yourself.

4.If it doesn't work, verify your account settings.(If you encounter any warning messages, please follow the instructions in those messages)
Manually configuring Mail
1.Open Mail (click it on the Dock or open it from the Applications folder).
2.If the "Welcome to Mail" assistant does not appear, choose Add Account from the File menu.
3.Fill in the Full Name, Email address, and Password fields.
Note: Your email account password will be stored in Keychain and used automatically to login to your email account when you open Mail.
4.Deselect "Automatically set up account" if it is enabled. Click Continue to proceed.
5.Choose the proper Account Type.
6.Give your account a useful description, such as "Anne's Gmail account" or "Juan's Yahoo! email account". It can be called whatever you want.
7.Enter your Incoming Mail Server, User Name and Password. Click on Continue to proceed.
8.If prompted, enter your Incoming Mail Security settings. Click Continue to proceed.
9.For Outgoing Mail Server, a useful description such as "Gmail Outgoing Mail Server" or "Yahoo! Outgoing Mail Server".
10.Enter the Outgoing Mail Server details.
11.If necessary, select "Use Authentication" and enter your User Name and Password. Click Continue to proceed.
12.If prompted, enter your Outgoing Mail Security settings. Click Continue to proceed.
13.Verify your settings in the Account Summary. Check "Take account online". Click "Create" to complete the process.
To configure a Yahoo email account in Mail, you need a Yahoo! Mail Plus subscription, which may require an additional fee.
Tuesday, March 30, 2010
Magic Mouse To Work on Windows
Drive For Magic Mouse for Windows:
Windows 32Bit Driver
Windows 64Bit Driver
Setting up Details
Go to the control panel, click on the mouse, go to the bluetooth tab, then select connect. It went through the discovery process again and this time it found it. It asked for an authentication number and i put in 0000, a defacto standard for pairing. It saw the mouse, paired it, and now it will work for basic functions. It is basic functions only though.
Note: Magic mouse will work as Normal mouse it wont have all the function like in Mac.
Advance Smart Folder on your finder
All of us regularly download some thing or the other from net on daily bases and each time we need to go to download folder and move to our selected folder. With Smart Folder finder its just easy.
Click on menu File> New Smart Folder.
Click the "+" symbol located on right top conner of New Smart Folder.
On the Pop which is the given image Select the kind of search file you want to save.
The select kind of match you want like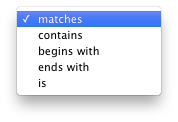
and type related file like

and click save You can find this Folder on finder Search Foror on the location you give.
Click on menu File> New Smart Folder.
Click the "+" symbol located on right top conner of New Smart Folder.
On the Pop which is the given image
 Select the kind of search file you want to save.
The select kind of match you want like

and type related file like

and click save You can find this Folder on finder Search Foror on the location you give.
Creating Smart Address Book for your iPad, iPod and iPhone
Creating Smart Address Groups is very easy on a Mac either it can be Phones Nos, Email or Address.
This steps can work on existing or new Importing vCARD.
Address book Menu File>
New Smart Group.(new pop up pops)
Give Your Smart Group Name.
Here i am sorting my Gmail Friend from my friends List so i Gave Gmail.
in Contains Card Which match the Following Condition:
on first selection select what type of sorting you plan to do.Here i selected email on second selection i gave ends with and typed gmail.com and all my gmail friends got sorted.

My Cheat Sheet
Are you Buying your new Laptop/Desktop, Don't Forget to create your Cheat Sheet (Do hide it)
My Cheat Sheet
I have a _____________(Name Of the Product)computer
My Laptop/Desktop.
OS Version: Processor:
Memory: _____________ MB or GB (circle one)
My serial number is(if any)____________________
My hard drive is__________ GB
My optical drive is (circle one): CD-ROM/CD-RW/DVD-ROM/DVD-RW
My Account
My account name is
My account short name is
My account password is
My account is Admin/Standard/Managed
My Emergency Contacts
Tech Support: +919999999999
Service Provider -savvy friend:
My Internet
(Get this information from your internet service provider
My ISP is
Their phone number is
Their website is
My account name is
My password is
To connect, I use (check all that apply):
Internal modem
dial-in phone number:_____________
DSLmodem brand/model: __________
cable modem brand/model:__________
router brand/model:___________
I connect wirelessly:
Network name:________
Password:_________
My Email
(Get this information from your email provider. The email provider is often the internet service provider.)
My email provider is
Their phone number is
My email address is
My email password is
This is a POP/IMAP account (circle one)
My incoming (POP) mail server is:
My outgoing (SMTP) mail server is:
Port number Authentication? Y/N
Attach additional sheets for more email accounts.
• don’t forget to hide me • don’t forget to hide me • don’t forget to hide me • don’t forget to hide me
Subscribe to:
Posts (Atom)
-
In today's mobile-driven world, organisations need efficient and secure ways to manage employee devices. Apple's Account-Driven En...
-
 In today's digital age, the workforce is increasingly mobile, with employees relying on smartphones and tablets to carry out their daily...
 -
How to downgrade from OS X El Capitan back to OS X Yosemite If you decide the OS X El Capitan public beta just isn't for you, you can...
